Importing a Large StitchFix Wardrobe Using Claude Desktop and Playwright
Automate adding items from your StitchFix purchase history while taking advantage of StitchFix's ability to match items to other items you own.
Tags:
Why you might want to use this approach
This approach and tool combination make sense if you:
- Have a large history of StitchFix purchases that you would prefer to automate rather than add manually
- Already have a Claude Pro subscription, or don't mind purchasing one for a month to automate your initial wardrobe onboarding
- Are comfortable configuring Claude Desktop to use MCP servers, or are interested in learning, but do not feel comfortable using Claude Code via the terminal. Claude Code's MCP client implementation is more robust and less error prone, but a little more challenging for users uncomfortable with the command line.
Prerequisites
In order to follow this tutorial, you need to have the following:
- A Claude Pro or Max account - Claude's Free accounts to not allow the use of MCP tools. Note that if you have an exceptionally large collection, you may need to split up your importing in a few sessions to avoid hitting usage limits.
- The Claude Desktop app installed. Note that for this tutorial, the Claude.ai web app will not work, as it is incompatible with the Playwright MCP Server.
- Node.js installed. This is required to run the Playwright MCP Server.
Process
Set up the MCP Servers
The first thing we need to do is to configure Claude Desktop to use two MCP servers. MCP is a standard that allows AI Applications to access external systems. For this tutorial, we're going to utilize Caffeinated Wardrobe's remote MCP server, which allows you to update your Wardrobe using an AI app like Claude. We're also going to utilize the Playwright MCP server, which allows Claude to control a web browser. There are many ways of enabling AI control of a browser, but we're using Playwright here because its ability to execute JavaScript in the browser enables it to more easily get the image URLs from StitchFix's website.
Add the Caffeinated Wardrobe MCP server as a remote MCP server
If you have not already, follow our documentation to add the Caffeinated Wardrobe MCP server to Claude Desktop.
Configure the Playwright MCP server
Unlike the Caffeinated Wardrobe MCP server, the Playwright MCP server runs locally on your system, so it needs to be configured differently.
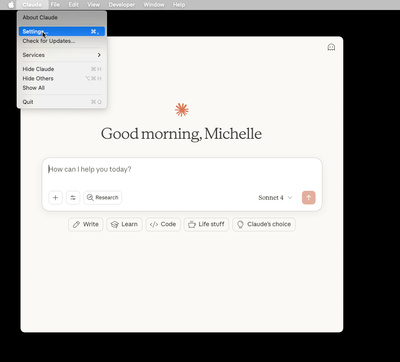
- Go to Claude Desktop's menu and choose Settings:
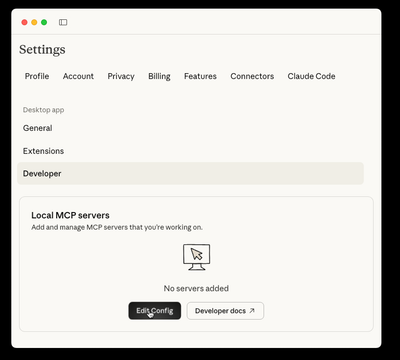
- Click on "Developer":

- And then "Edit Config":
- This will create a new settings file or open an existing one. If you haven't edited the file below, you should just be able to copy and paste the following. If you already had other MCP servers configured, just add the "playwright" section to your existing config:
{
  "mcpServers": {
    "playwright": {
      "command": "npx",
      "args": [
        "-y",
        "@playwright/mcp@latest"
      ]
    }
  }
}- Save the file, and restart Claude Desktop
Log in to StitchFix in Playwright
Playwright runs an isolated instance of your browser, so if you're doing this for the first time, you'll need to log in to your StitchFix account. To do that, copy and paste the following prompt into Claude Desktop, wait for Claude to open the browser, and then log in to your account:
Open a Playwright browser to https://stitchfix.com so that I can log in.
Add initial information about your Kept Items
When you view the product pages of items you've purchased in the past, StitchFix very helpfully shows other items that you own that go with that item. We can use this information to help build outfit suggestions by making these items "related" to each other. To do this, we will first add all of the items using just the information in your "Kept Items" page, and then we will use each product detail page in a second pass. Using the Playwright browser involves passing a lot of "context" to Claude's large language model, and the amount of context each chat can handle is limited. In order to facilitate switching to a new chat when needed, we'll do this one page at a time. Copy and paste the prompt below in a new Claude chat. Change the page number in the URL as necessary.
Open a Playwright browser to my StitchFix Kept Items page at https://www.stitchfix.com/wardrobe/bought-items?page=1

I need you to add each item from this page to my Caffeinated Wardrobe. Here's the step-by-step process I'd like you to follow:

1. **First, take a snapshot** of the current page to see what's available
2. **Analyze the page structure**: Inspect the HTML and identify the most reliable CSS selectors for:

    - Item containers
    - Item names/titles
    - Brand information
    - Color details
    - Product URLs
3. **Test extraction on one item**: Extract data for just one item first and show me the structure you found, including what selectors worked and any fallback methods needed
4. **Extract all items systematically**: Once the structure is confirmed, extract all items with error handling for missing data
5. **For each item, add to Caffeinated Wardrobe** with:

    - Item name (from the link text or product title)
    - Brand name
    - Color information
    - Product URL (the StitchFix product page link)
    - Appropriate category (tops/bottoms/blazers/dresses/shoes/jewelry/accessories)
    - The store (StitchFix)

**Important requirements:**

- Don't click on items to go to detail pages - extract everything from the main listing page
- Use error handling and fallback selectors if primary methods fail
- If any items fail to extract properly, let me know which ones and why
Add additional information from each product's detail page
Once you have the initial entries created for each item, you can have Claude get the URL for each item from Caffeinated Wardrobe, then visit the page for each item to pull out the relevant details, with this prompt:
Get a list of all of the items in my Caffeinated Wardrobe and order them by date created from oldest to newest. Starting with the oldest, get the details of the item - if it has already been updated, it will have a description, but if it has not, the description will be empty. Once you find an item that hasn't been updated, open the url in the Playwright browser and do the following:
* Extract the price and size
* Expand the Materials and Care section and extract the materials.
* Expand the Product Details section and extract the description along with any relevant tags that may be there.
* Update the item in Caffeinated Wardrobe with those details.
* Use javascript to extract the URLs of images for the item, and upload those images.
* Under the "Ways to wear it" section, look for items marked as "You own". Find the matching items in Caffeinated Wardrobe and relate the current item to those items. Items you own should be matched by both name and color, since my wardrobe may contain the same item in multiple colors.
Then continue to the next item.
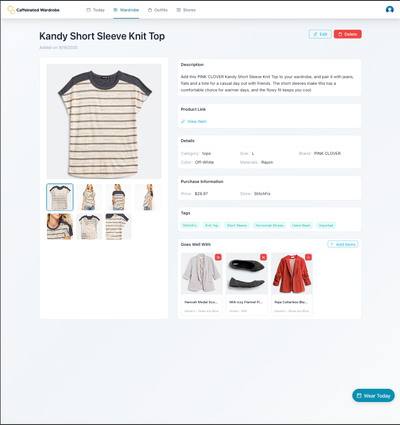
Review your wardrobe
You should now be able to see your imported items with all the relevant detail in Caffeinated Wardrobe: